Why LV Bushing Replacement Needs a Plan, Not a Reaction
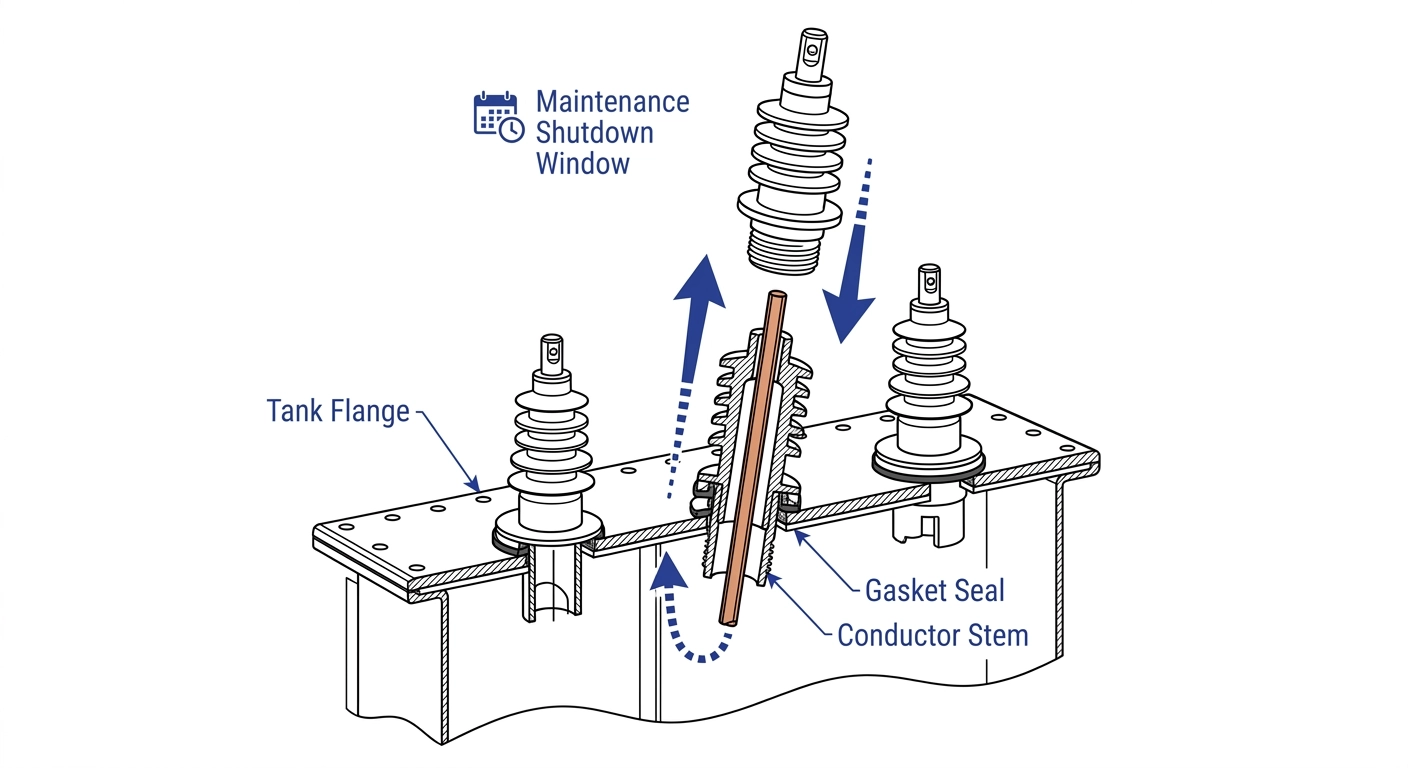
A low-voltage bushing carries current through the transformer tank wall while maintaining dielectric separation from the grounded tank surface. It relies on a compression seal between the housing and the tank flange to keep insulating oil in and moisture out; gasket compression set from repeated thermal cycling is a common root cause of aging bushings. Detailed selection and construction differences are covered on ZeeyiElec’s transformer accessories product page.
In our deployments across 200+ transformer installations, LV bushing degradation rarely announces itself early. Oil weeping, hairline housing cracks, or a rising tan δ (dielectric loss factor) trend are usually the first visible signs, and by the time any appear, the bushing is already past its optimal replacement window. Treating replacement as a reactive, failure-triggered task means an unplanned outage, spares sourced under time pressure, and unpredictable downtime.
Planned replacement inside a scheduled maintenance shutdown avoids this. It lets procurement lead times — often 4–8 weeks for correctly rated LV bushings — run in parallel with normal operation, and keeps outage duration predictable. IEC 60137:2017 (Clause 7–9, covering routine tests, dielectric withstand, tan δ, and partial discharge requirements) governs the test requirements bushings in this voltage range must meet, and checking it when specifying replacements — rather than assuming “like-for-like” — helps catch cases where the original bushing’s rating no longer matches present loading. The rest of this article works through assessment, spares planning, sequencing, and acceptance testing.
Pre-Shutdown Assessment: Deciding Which Bushings Get Replaced
Not every LV bushing scheduled for a shutdown needs replacement. A structured assessment beforehand prevents both under-replacement and unnecessary spares cost.
Condition Indicators to Check Beforehand
Visual condition: hairline cracks or crazing on housings, oil staining at the flange gasket line
Electrical testing: tan δ trending — a reading climbing more than roughly 0.3–0.5 percentage points above baseline generally signals internal moisture or aging insulation, though the qualifying threshold depends on bushing type
Torque/seal integrity: any history of retightening the same flange bolts signals the gasket is no longer holding
Age and Loading History Factors
LV bushings rated near their nameplate current age faster, since thermal cycling accelerates gasket compression set. Across multiple bushing replacement projects, units older than 15–20 years operating at sustained high load factor are disproportionately represented in unplanned failures, even when visual condition looked acceptable.
[Expert Insight: Using the Selection Guide During Assessment]
Cross-check the installed bushing’s voltage/current rating against the transformer’s current nameplate, not its original one
A rating mismatch found here is itself a reason to replace, independent of physical condition
Document each bushing’s outcome (replace / monitor / replace-if-time-allows) before the shutdown is scheduled — this list drives spares procurement.
Spare Parts and Procurement Lead-Time Planning
Once the assessment produces a replace list, procurement becomes the critical path. LV bushing lead times typically run 4–8 weeks for standard ratings and longer for uncommon current ratings or housing materials, so ordering cannot wait until the shutdown date is finalized.
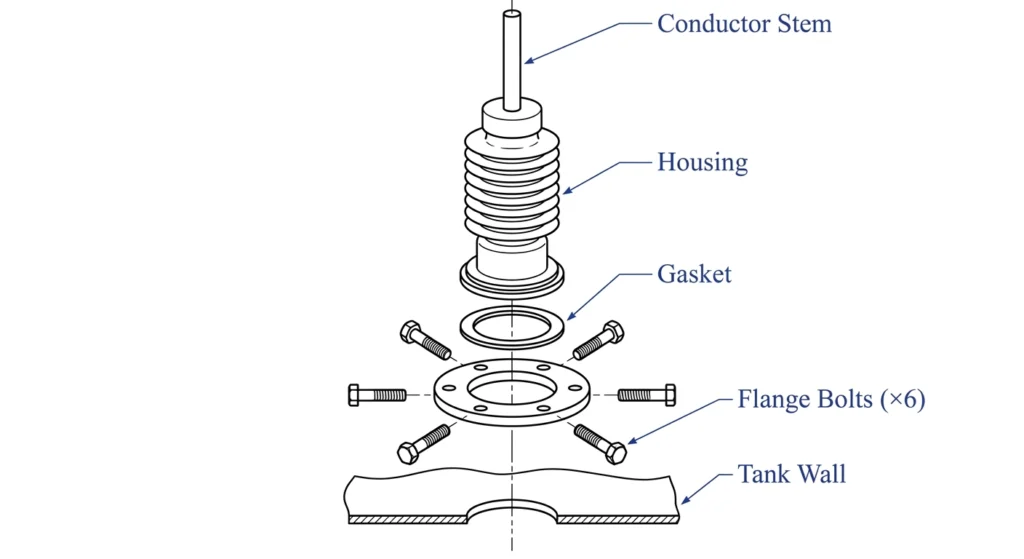
Component layout of an LV bushing assembly, showing the gasket and flange hardware confirmed before ordering spares.
What to Confirm Before Ordering
Rated voltage and current — checked against the transformer’s current nameplate
Mounting dimensions — flange bolt pattern and spacing, since units from a different manufacturer are not always drop-in compatible
Housing material — porcelain versus polymer, matched to site contamination and impact conditions
Gasket and hardware kit — order new gaskets, flange bolts, and sealant with every bushing; reusing a compressed gasket defeats the purpose
In field commissioning of 24 kV distribution networks and their LV-side terminations, shutdown schedules have repeatedly slipped because a gasket kit was assumed included with the bushing and wasn’t. A small buffer stock (1–2 spare units beyond the confirmed list) is a reasonable hedge against a unit failing incoming inspection. The Transformer Accessories RFQ Checklist lists the minimum specification fields a supplier needs to quote accurately.
Sequencing the Shutdown: Step-by-Step Replacement Workflow
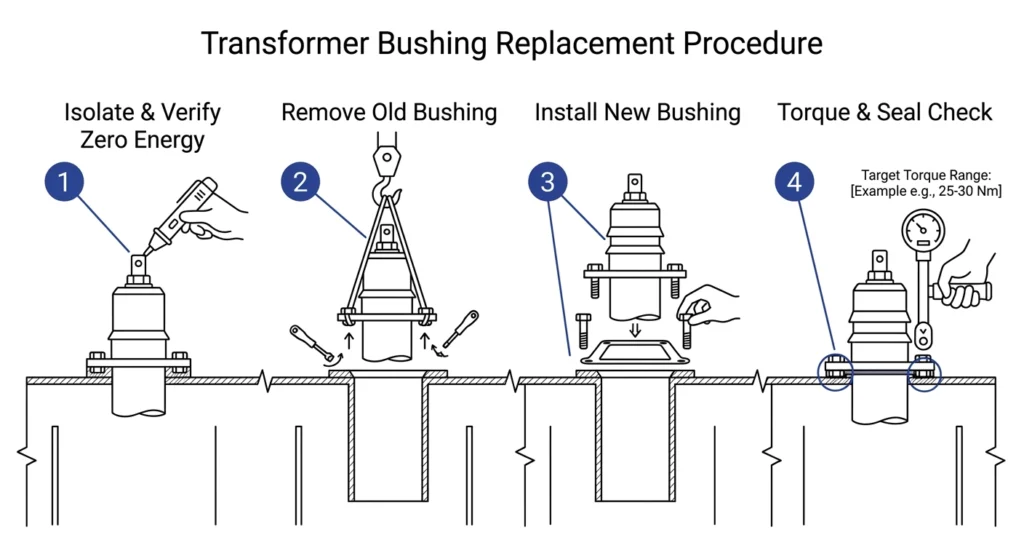
Once spares are on-site and confirmed, the physical work follows a fixed sequence. Skipping the de-energization verification step is the most common source of near-miss incidents on bushing work.
Step sequence for LV bushing replacement, from isolation and de-energization through torque and seal verification.
Isolation and De-Energization
Confirm isolation per lockout-tagout procedure, including any low-voltage backfeed paths from downstream generation or interconnected buses
Verify zero energy with a rated voltage detector at the bushing terminal itself, not only at the upstream breaker
Drain or lower oil level below the mounting point if the design requires it
Removal and Installation
Disconnect and support external LV cabling before loosening flange hardware, to avoid stressing cable lugs
Remove flange bolts in a cross pattern to avoid uneven gasket release
Fit the new gasket dry (no sealant unless specified) and torque flange bolts in a cross pattern, typically 15–35 N·m depending on bushing size — over-torquing is a common cause of housing cracking on polymer units
Reconnect LV cabling, restore oil level, and check for gasket seepage once oil settles
[Expert Insight: Torque Logging]
Log the actual torque value per bolt, not just “torqued to spec”
This record is useful if a seal issue surfaces during post-shutdown inspection
Cross-pattern tightening sequence matters as much as the final torque value
Common Field Risks During Replacement and How to Mitigate Them
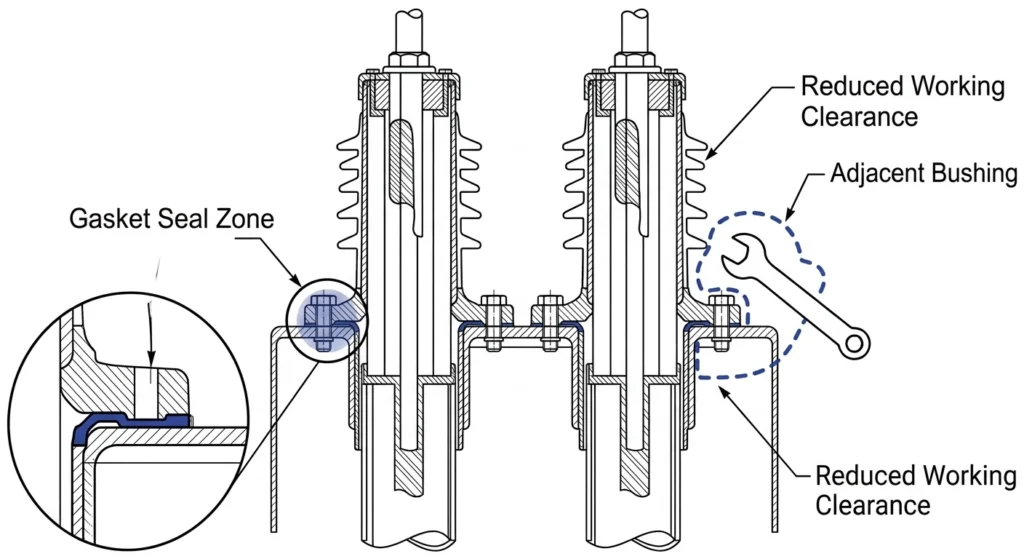
Cutaway view highlighting the gasket seal zone and adjacent-bushing clearance risk during replacement work.
Gasket and Oil Handling Risks
Reused or damaged gasket: even an intact-looking gasket can have lost compression set; always fit new gaskets
Contaminated sealing surface: oil residue or debris on the flange face prevents even gasket compression
Moisture ingress during draining: an open tank exposed to humid air for an extended period allows moisture absorption into remaining oil and exposed insulation, especially in tropical or coastal conditions
Mechanical Risk to Adjacent Bushings
Bushings mounted close together on the same tank wall can be stressed by leverage applied while removing a neighboring unit. [VERIFY STANDARD: manufacturer torque and clearance specification] should be checked when spacing is tight, since generic torque values don’t account for reduced working clearance. Across closely spaced LV terminal arrangements specifically, cracked adjacent bushing housings have mostly traced back to a wrench slipping during removal of the neighboring unit, which is why supporting the neighboring terminal before applying torque is worth the extra minute.
Post-Replacement Testing and Acceptance Criteria
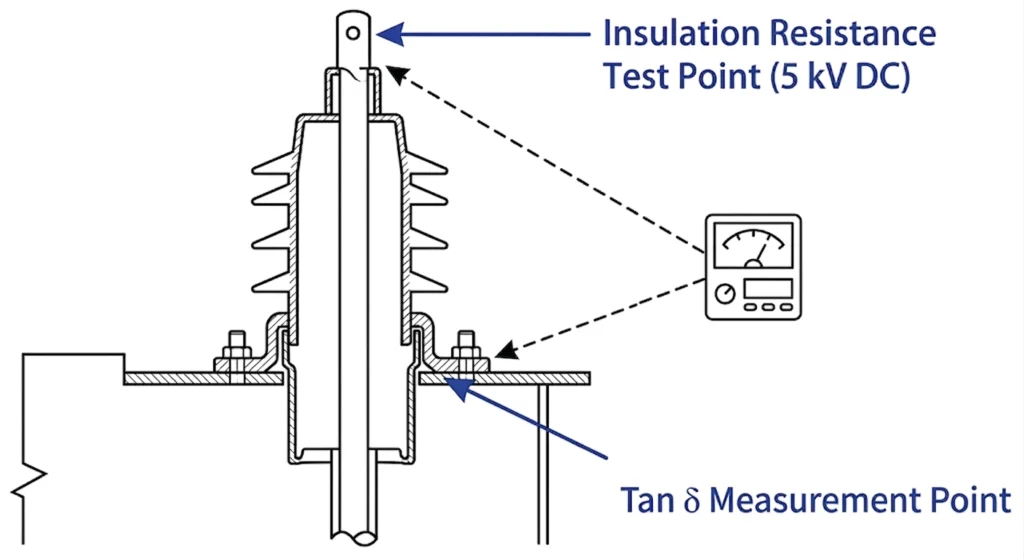
Acceptance test setup showing insulation resistance and tan δ measurement points on a newly installed LV bushing.
Before re-energizing, confirm the new bushing meets acceptance criteria rather than assuming a new unit is automatically compliant — a damaged gasket seat or a manufacturing defect can still slip through.
Minimum Acceptance Checks
Test
Typical Acceptance Range
Notes
Insulation resistance
Above 1000 MΩ at 5 kV DC (context-dependent)
Compare against baseline, not an absolute pass/fail line
Tan δ
Within manufacturer baseline ±0.2–0.3%
Elevated readings may indicate installation moisture ingress
Visual/torque check
All flange bolts within specified torque range
Recheck after first thermal cycle if possible
Oil level (oil-filled)
At sight glass reference mark
Confirm after temperature stabilizes
According to IEC 60137, insulated bushings for AC voltages above 1000 V must meet defined dielectric and routine test requirements, and referencing this standard when defining acceptance criteria for LV bushings keeps the test plan consistent with recognized practice even though LV units sit at the lower end of its scope.
Working With a Bushing Supplier That Supports Shutdown Timelines
Shutdown planning is only as reliable as the supplier behind it. A bushing that meets specification on paper but arrives two weeks late turns a planned replacement back into a reactive one. When evaluating a transformer accessories supplier for shutdown-driven orders, ask about standard lead times by rating, whether gasket and hardware kits ship as standard with the bushing, and whether mounting dimensions are documented clearly enough to confirm fit before the shutdown window opens.
ZeeyiElec supplies LV and MV bushings alongside cable accessories for teams coordinating both transformer- and cable-side maintenance in the same outage window. Confirming rated voltage, current, mounting dimensions, and hardware kit contents before ordering — and building in a small spares buffer — is generally what separates a shutdown that finishes on schedule from one that doesn’t.
Frequently Asked Questions
How far in advance should LV bushing replacements be scheduled before a shutdown?
Given typical 4–8 week procurement lead times for standard ratings, ordering should begin at least 8–10 weeks before the shutdown date, with additional buffer for less common ratings or housing materials.
What condition indicators justify replacing an LV bushing versus continued monitoring?
Visible cracking, oil weeping at the flange, or a tan δ trend rising more than roughly 0.3–0.5 percentage points above baseline generally justify replacement, while units within normal trending ranges can typically continue to be monitored.
How long does a typical LV bushing replacement take per unit during a shutdown?
Individual replacement time varies with accessibility and oil-handling requirements, but crews commonly allow a defined window per unit for isolation, removal, installation, and torque verification, plus contingency for adjacent-bushing clearance issues.
What spare parts should be stocked before starting bushing replacement work?
At minimum, new gaskets, flange bolts, and manufacturer-specified sealant per bushing, plus 1–2 buffer units beyond the confirmed replace list to cover incoming inspection failures.
What tests confirm a newly installed LV bushing is ready for re-energization?
Insulation resistance and tan δ measurements compared against manufacturer baseline, combined with a flange bolt torque and oil-level check, are the minimum acceptance checks before re-energizing.
Can LV bushings from different manufacturers be mixed on the same transformer?
Electrically this is often possible if voltage and current ratings match, but mounting dimensions and hardware compatibility should be verified first, since flange patterns are not universally standardized.
yoyo shi
Yoyo Shi writes for ZeeyiElec, focusing on medium-voltage accessories, transformer components, and cable accessory solutions. Her articles cover product applications, technical basics, and sourcing insights for global electrical industry buyers.





 English
 한국어
한국어 العربية
 Español
 हिन्दी
 தமிழ்
தமிழ் Deutsch (Sie)
 Français
 Português do Brasil
 Русский